1. You start with a circle first. Here are three possibilities to draw circles. Practise really helps to make good circles! Use the method you're the best at.
1. Take the pencil and shape a circle by moving only your shoulder, nor your hand or your arm. You're getting many, soft lines you can easily erase. I'd suggest to use this method only when you're drawing bigger sketches, else it is a bit tricky to find out which line belongs to what when you're inking it.

2. Use flicking motions in a circular shape by moving your fingers and your hand. You gonna need good eye-hand koordination and a good imagination of what a perfect circle looks like for this. You'll get almost one straight line when you're good at this. It's not too soft but also not too harsh.

3. The third one would be that you draw a circle in one continued line but this is most tricky and the line might be too harsh to erase and correct it more than twice. Even I had to correct the right half of it by using the second method.

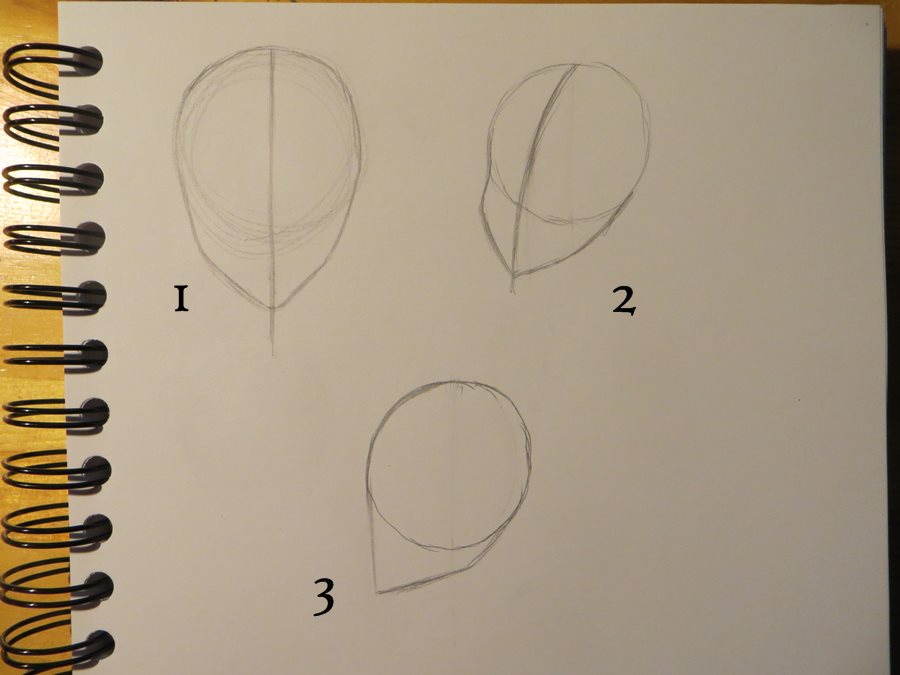
2. Now you draw a line to mark the half of the face. Draw it a bit longer than the circle, because the chinn is going to be there. Watch out for the perspective here!
1. Front: the half of the face is exactly the half of the circle.

2. Half-side: The line starts at the same point as in the front perspective, curves down 'till it meets the circle again. Then the curve goes down more straight.

3. Side: the line for the nose and the chinn has also the same start point and follows the outline of the circle to end like a straight line. It almost looks like a 'P'

3. It is time to shape the chin. This is the point where you have to think about how the charakter looks like, but I'll make another post for different shapes someday.
1. Front: try to make both lines as symetrical as possible. This is an example for a teenage boy.
2. Half-side: on the backside you see the cheeks and a little curve where the eyes are going to be (where the line crosses the circle)
3. Side: This perspective has something strange because in the others you see organic forms and this one is like totally flat.
4. Position of eyes, nose, lips and neck and ears is almost the same: The horizontal line for the eyes is right in the middle of the face, the nose ends half way from the horizontal line to the chin and the mouth is the half way down again. This is also on the same level as the jawbone. The ears can be from the horizontal line to the mouth, depends on your character. I mostly draw these from the eyes to the nose.
1. Front: the nose ends exactly where the circle crosses the line at the half of the face. The neck starts just a little bit besides the jawbone.

2. Half-side: The neck starts behind the ear, where the horizontal line meets the circle and a little bit besides the chin.
3. Side: The ear is a little bit behind the half of the circle, the neck starts where the circle and the chin-line are meeting and on the half way from the circle's half-line and the chin. It does not go straight down, it goes a bit to the backside.

5. Now you can draw the face more detailled but you have to watch out at certain areas:
1. Front: make sure: the eyes don't start right at the sides of the face and also leave the space for one third eye between both eyes!

2. Half-side: The eye at the backside is smaller, but you can see where the lashlines end.

3. Side: The nose bows in where the eyes are, the chin is a bit behind the vertical line of the face and you can see the lips! Make sure to leave a half eye-sized gap between the bow of the nose and the eye.

If you have questiones or wishes, leave a comment below!
toll erklärt. Ich bewundere Menschen, die Menschen zeichnen können.
ReplyDeleteLG Gusta